Lab 4: Develop an own GitOps module
1. Objective
The objective is to understand how to build and use a custom module for the TechZone Accelerator Toolkit.
Therefor a custom module will be created in GitOps scenario to deploy a helm-chart for an example application.
The custom module will be deployed on a Red Hat OpenShift cluster on IBM Cloud with Argo CD configured for GitOps.
2. What do we cover in that lab 4?
These are the major topics:
-
We
inspectthe template-terraform-gitops. -
We
create a custom moduleforTechnology Zone Accelerator Toolkitstep-by-stepusing the ubi-helm example from the Argo CD GitHub repository. -
We will see how to use a
custom modulein aBOM(Bill of material) -
We will see how to create and use a
custom catalogfor acustom module -
We will inspects the usage of a
custom module
That are the following sections:
- Understand the template-terraform-gitops
- Use the template-terraform-gitops to create a module to deploy the terraform-gitops-ubi example
- Implement the new
terraform-gitops-ubimodule - Create an own catalog
- Create Terraform code with
iascableand create the IBM Cloud resources with Terraform - Verify the created Argo CD configuration on GitHub
3. Understand the template-terraform-gitops
The template-terraform-gitops is a part of the How to instructions of the Technology Zone Accelerator Toolkit. The module covers the GitOps topic.
4. Use the template-terraform-gitops to create a module to deploy the terraform-gitops-ubi example
These are the main tasks:
- Create a GitHub repository based on the
gitops templatefromSoftware Everywhere - Configure the
terraform-gitops-ubimodule - Create an own
catalogfor theterraform-gitops-ubimodule - Create a
BOM(Bill of material) where theterraform-gitops-ubimoduleis used and create the needed terraform output withiascable
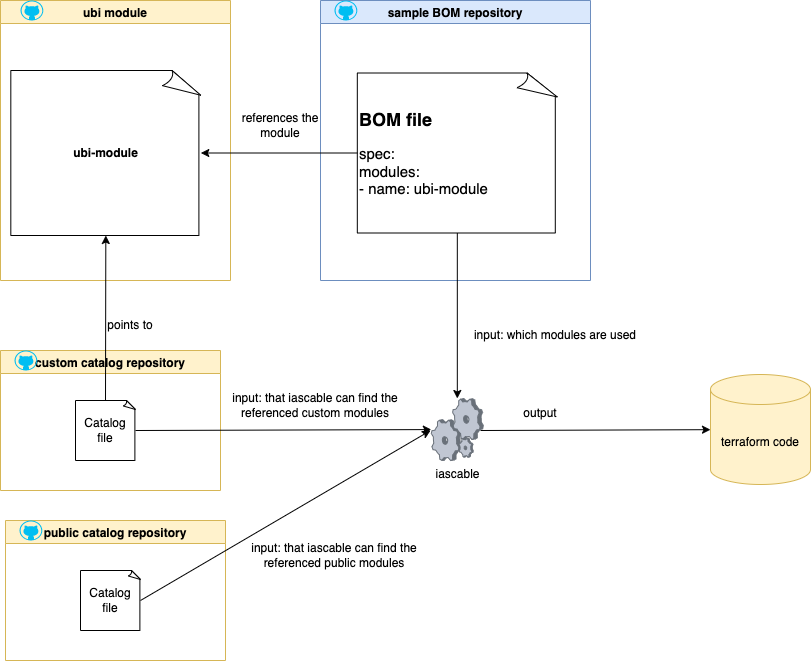
We will use later two catalogs and one BOM (Bill of material). here is a simplified view of the dependencies we will have later.
4.1 Prepare the environment
4.1.1 Create a new GitHub repository based on the gitops template
We clone the gitops template repository to our local computer and we going to create our terraform-gitops-ubi repository.
Step 1: Clone the GitHub gitops template repository to your local computer and create a new GitHub repository based on that template
You can follow the steps in the blog post to do this.
Then you should have following folder structure on on computer:
├── LICENSE
├── README.md
├── main.tf
├── module.yaml
├── outputs.tf
├── scripts
│   └── create-yaml.sh
├── test
│   └── stages
│       ├── stage0.tf
│       ├── stage1-cert.tf
│       ├── stage1-cluster.tf
│       ├── stage1-cp-catalogs.tf
│       ├── stage1-gitops-bootstrap.tf
│       ├── stage1-gitops.tf
│       ├── stage1-namespace.tf
│       ├── stage2-mymodule.tf
│       ├── stage3-outputs.tf
│       └── variables.tf
├── variables.tf
└── version.tf
4.1.2 Install iascable
We install iascable to ensure you use the latest version.
Step 1: Install iascable on your local computer
curl -sL https://iascable.cloudnativetoolkit.dev/install.sh | sh
iascable --version
- Example output:
2.17.4
4.1.2 Install a Multipass
We will follow the instructions for Multipass. The following steps are an extractions of the cloud-native-toolkit documentation with small changes when needed.
Step 1: Install Multipass with brew
brew install --cask multipass
Step 2: Download cloud-init configuration
curl https://raw.githubusercontent.com/cloud-native-toolkit/sre-utilities/main/cloud-init/cli-tools.yaml --output cli-tools.yaml
Step 3: Start the virtual cli-tools machine
multipass launch --name cli-tools --cloud-init ./cli-tools.yaml
5. Implement the new terraform-gitops-ubi module
In that section we will modify files in our newly created repository. These are the relevant files for our new module.
- The
main.tffile - The
variable.tffile - The
helm chartcontent - The
module.yamlfile - Configure the
helm chartcopy automation in thescripts/create-yaml.shfile - Create for
terraform-gitops-ubiGitHub repositorytagsandreleases
5.1 The main.tf file
Step 1: Do some modifications in the main.tf file
-
Change
name = "my-helm-chart-folder"toubi-helm -
First add
ubi-helm = {// create entry}to thevalues_content = {}. That entry will be used to create the values for the variables in thevalues.yamlfile for the helm chart.
Below you see the relevant code in the main.tf which does the copy later. As you can is it uses the {local.name} value, so you need to ensure the name reflects the folder structure for your helm-chart later.
resource null_resource create_yaml {
  provisioner "local-exec" {
    command = "${path.module}/scripts/create-yaml.sh '${local.name}' '${local.yaml_dir}'"

    environment = {
      VALUES_CONTENT = yamlencode(local.values_content)
    }
  }
}
These are the values we need to insert for our terraform-gitops-ubi application as variables for the helm-chart. You find the variables in the Argo CD github project for the ubi-helm values.yaml
Now replace the // create entry with the needed values.
    ubi-helm = {
      "replicaCount": 1
      "image.repository" = "registry.access.redhat.com/ubi8/ubi"
    }
-
Change
layer = "services"tolayer = "applications" -
Add
cluster_type = var.cluster_type == "kubernetes" ? "kubernetes" : "openshift"to thelocals -
Resulting
locals sectionin themain.tffile
locals {
  name          = "ubi-helm"
  bin_dir       = module.setup_clis.bin_dir
  yaml_dir      = "${path.cwd}/.tmp/${local.name}/chart/${local.name}"
  service_url   = "http://${local.name}.${var.namespace}"
  cluster_type = var.cluster_type == "kubernetes" ? "kubernetes" : "openshift"
  values_content = {
    ubi-helm= {
      "replicaCount": 1
      "image.repository" = "registry.access.redhat.com/ubi8/ubi"
      "image.tag" = "latest"
      "command" = "${var.command}"
    }
  }
  layer = "applications"
  type  = "base"
  application_branch = "main"
  namespace = var.namespace
  layer_config = var.gitops_config[local.layer]
}
5.2 The variable.tf file
Step 1: Add some variables in the variable.tf file
variable "cluster_type" {
  description = "The cluster type (openshift or kubernetes)"
  default     = "openshift"
}

variable "command" {
  description = "command to run in container"
  default     = ""
}
5.3 The helm chart content
Step 1: Create a new folder structure for the terraform-gitops-ubi helm chart
- Create following folder structure
chart/ubi-helm. The name after chart must be the module name.
    ├── chart
    │   └── ubi-helm
    │       ├── Chart.yaml
    │       ├── charts
    │       │   └── ubi-helm
    │       │       ├── Chart.yaml
    │       │       ├── templates
    │       │       │   ├── _helpers.tpl
    │       │       │   └── deployment.yaml
    │       │       │   └── configmap.yaml
    │       │       ├── ubi-helm-v0.0.01.tgz
    │       │       └── values.yaml
    │       └── values.yaml
That will be the resulting folder structure for the terraform-gitops-ubi module on your local pc:
├── LICENSE
├── README.md
├── chart
│   └── ubi-helm
│       ├── Chart.yaml
│       ├── charts
│       │   └── ubi-helm
│       │       ├── Chart.yaml
│       │       ├── templates
│       │       │   ├── _helpers.tpl
│       │       │   └── deployment.yaml
│       │       │   └── configmap.yaml
│       │       ├── ubi-helm-v0.0.1.tgz
│       │       └── values.yaml
│       └── values.yaml
├── main.tf
├── module.yaml
├── outputs.tf
├── scripts
│   └── create-yaml.sh
├── test
│   └── stages
│       ├── stage0.tf
│       ├── stage1-cert.tf
│       ├── stage1-cluster.tf
│       ├── stage1-cp-catalogs.tf
│       ├── stage1-gitops-bootstrap.tf
│       ├── stage1-gitops.tf
│       ├── stage1-namespace.tf
│       ├── stage2-mymodule.tf
│       ├── stage3-outputs.tf
│       └── variables.tf
├── variables.tf
└── version.tf
Step 2: Copy in newly create folder structure the content from the repository for the ubi-helm chart https://github.com/ibm/ubi-helm/tree/main/charts/ubi-helm
Step 3: Validate the helm chart with following commands:
- Navigate the charts directory
CHARTDIR=./chart/ubi-helm/charts/ubi-helm
cd $CHARTDIR
- Verify the dependencies
helm dep update .
- Verify the helm chart structure
helm lint .
Example output:
==> Linting .
[INFO] Chart.yaml: icon is recommended

1 chart(s) linted, 0 chart(s) failed
helm template test . -n test
Example output:
# Source: ubi-helm/templates/configmap.yaml
apiVersion: v1
kind: ConfigMap
metadata:
  name: test-ubi-helm
  labels:
    app: ubi-helm
    chart: test-ubi-helm
    release: test
    heritage: Helm
data:
  COMMAND: echo helloworld!
---
# Source: ubi-helm/templates/deployment.yaml
apiVersion: apps/v1
kind: Deployment
metadata:
  name: test-ubi-helm
  labels:
    app: ubi-helm
    chart: test-ubi-helm
    release: test
    heritage: Helm
spec:
  replicas: 2
  revisionHistoryLimit: 3
  selector:
    matchLabels:
      app: ubi-helm
      release: test
  template:
    metadata:
      labels:
        app: ubi-helm
        release: test
    spec:
      containers:
        - name: ubi-helm
          image: "registry.access.redhat.com/ubi8/ubi:latest"
          imagePullPolicy: Always
          env:
            - name: COMMAND
              valueFrom:
                configMapKeyRef:
                  name: test-ubi-helm
                  key: COMMAND
                  optional: true # mark the variable as optional
          command: ["/bin/sh","-c"]
          args:
            - while true; do
              $COMMAND;
              sleep 1000;
              done;
helm package .
5.4 The module.yaml file
Step 1: Edited the module.yaml
- Use for
name:terraform-gitops-ubi - Use for
description:That module will add a new Argo CD config to deploy the terraform-gitops-ubi application
name: "terraform-gitops-ubi"
type: gitops
description: "That module will add a new Argo CD config to deploy the terraform-gitops-ubi application"
tags:
  - tools
  - gitops
versions:
  - platforms:
      - kubernetes
      - ocp3
      - ocp4
    dependencies:
      - id: gitops
        refs:
          - source: github.com/cloud-native-toolkit/terraform-tools-gitops.git
            version: ">= 1.1.0"
      - id: namespace
        refs:
          - source: github.com/cloud-native-toolkit/terraform-gitops-namespace.git
            version: ">= 1.0.0"
    variables:
      - name: gitops_config
        moduleRef:
          id: gitops
          output: gitops_config
      - name: git_credentials
        moduleRef:
          id: gitops
          output: git_credentials
      - name: server_name
        moduleRef:
          id: gitops
          output: server_name
      - name: namespace
        moduleRef:
          id: namespace
          output: name
      - name: kubeseal_cert
        moduleRef:
          id: gitops
          output: sealed_secrets_cert
5.5 Configure the helm chart copy automation in the scripts/create-yaml.sh file
Step 1: Configure the scripts/create-yaml.sh in terraform-gitops-ubi repository
Replace the existing code in scripts/create-yaml.sh with following content. This is important for later when the helm-chart will be copied.
#!/usr/bin/env bash

SCRIPT_DIR=$(cd $(dirname "$0"); pwd -P)
MODULE_DIR=$(cd "${SCRIPT_DIR}/.."; pwd -P)
CHART_DIR=$(cd "${SCRIPT_DIR}/../chart/ubi-helm"; pwd -P)

NAME="$1"
DEST_DIR="$2"

## Add logic here to put the yaml resource content in DEST_DIR
mkdir -p "${DEST_DIR}"
cp -R "${CHART_DIR}/"* "${DEST_DIR}"

if [[ -n "${VALUES_CONTENT}" ]]; then
  echo "${VALUES_CONTENT}" > "${DEST_DIR}/values.yaml"
fi
find "${DEST_DIR}" -name "*"
echo "Files in output path"
ls -l "${DEST_DIR}"
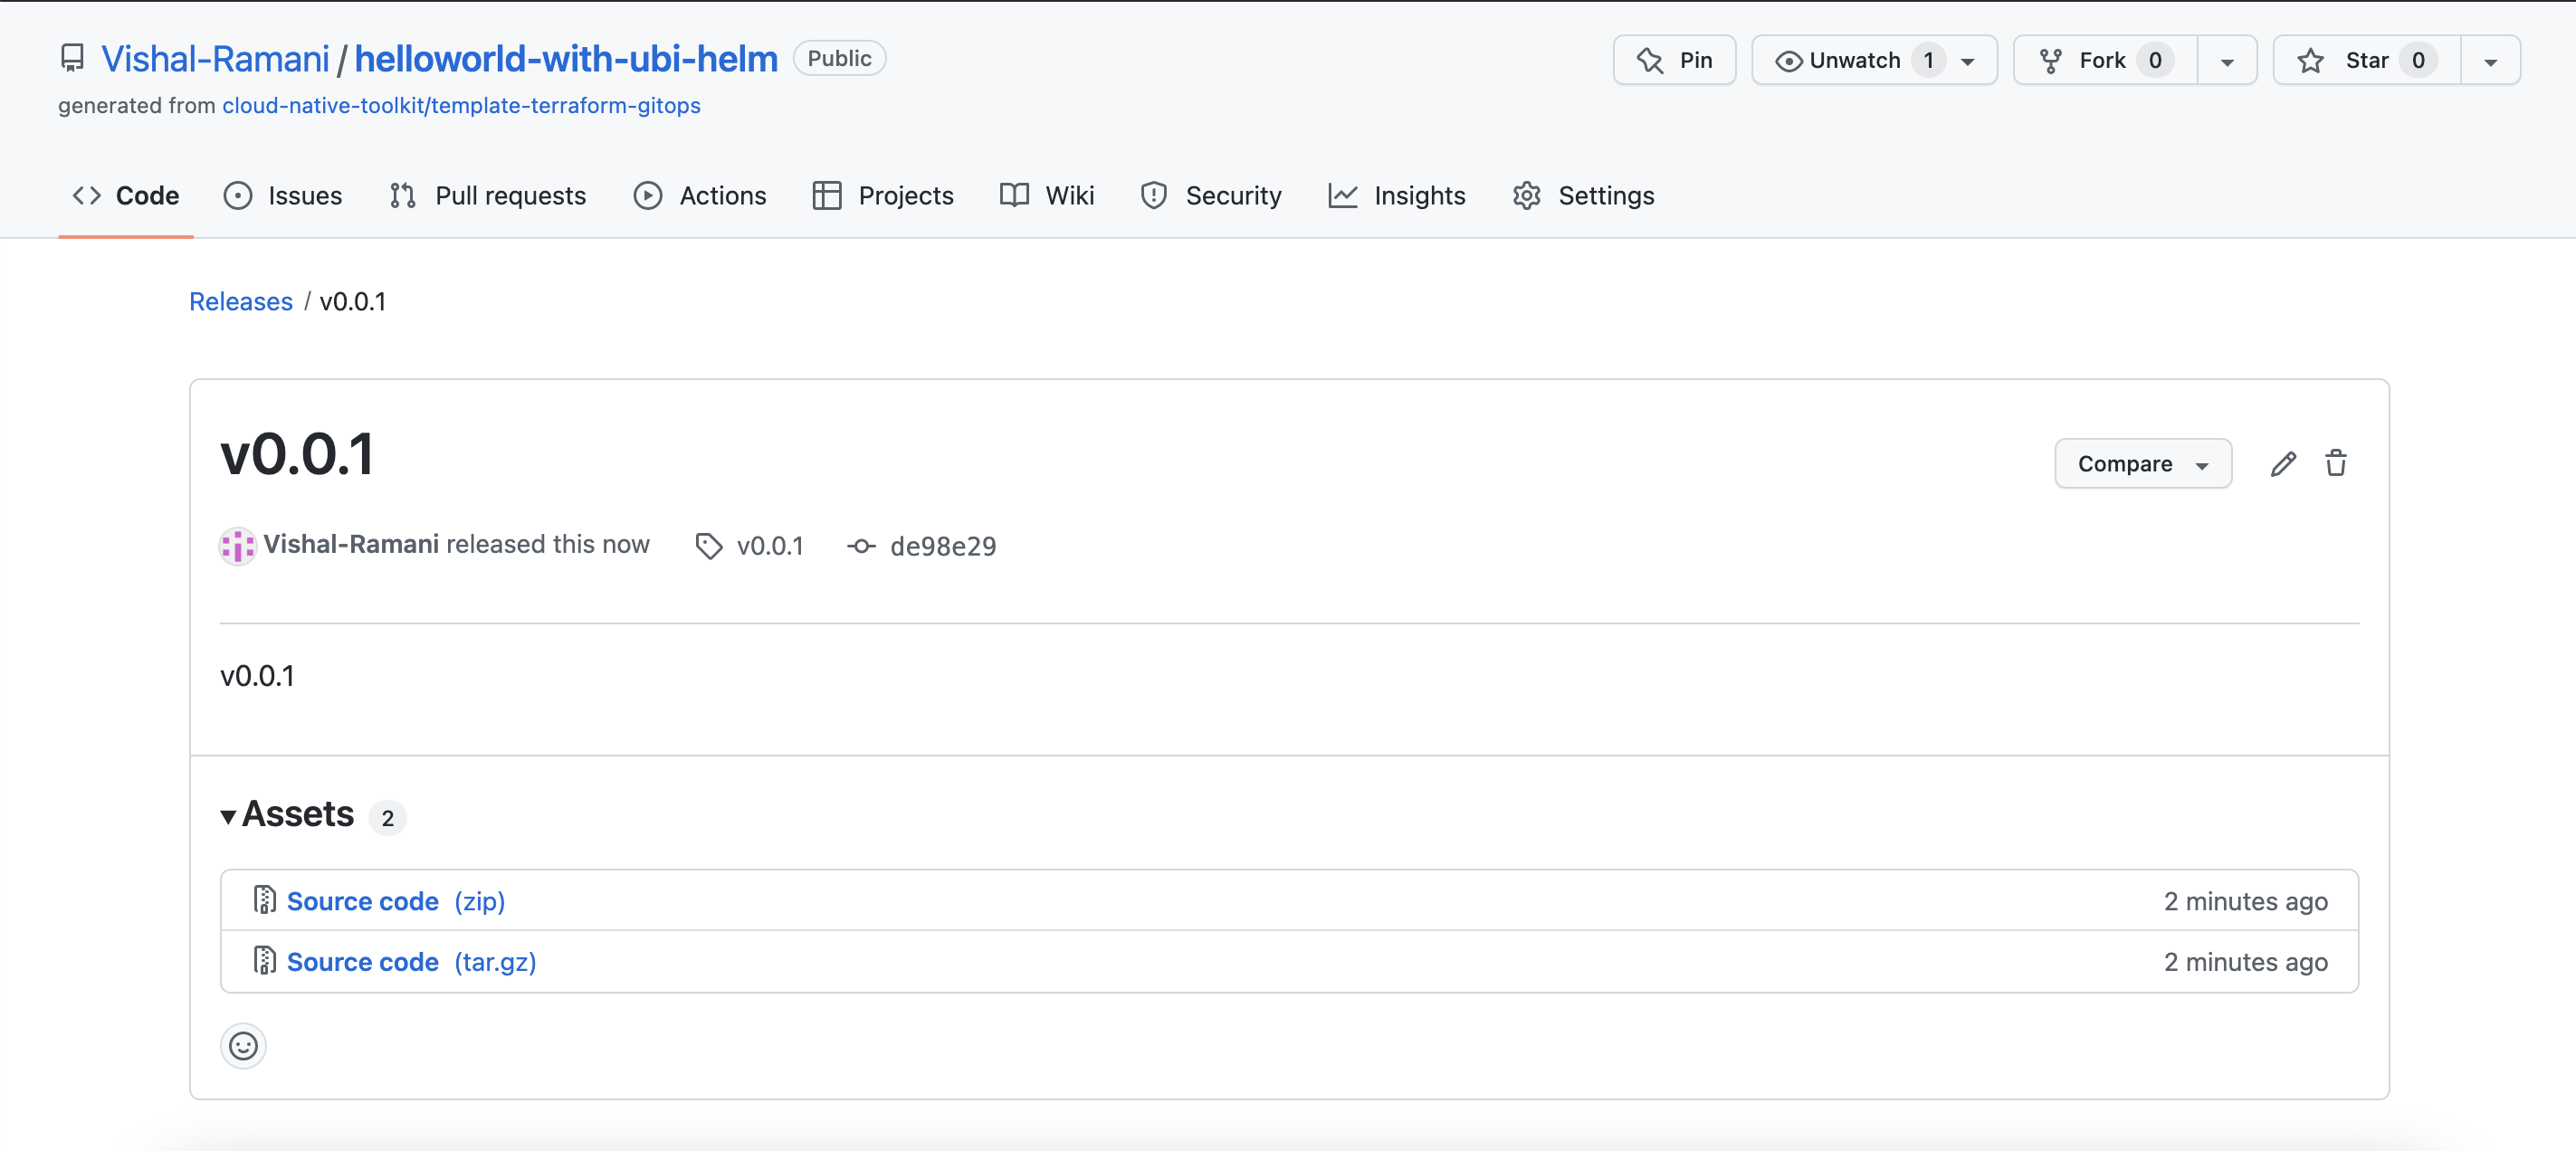
5.6 terraform-gitops-ubi GitHub repository tags and releases
The release tag represents the version number of our module. terraform-gitops-ubi
Step 1: Create GitHub tag and release for the terraform-gitops-ubi GitHub repository
The module github repository release tags should be updated when you are going to change the terraform-gitops-ubi GitHub repository module.
The image below shows some releases and as you can see for each release an archive is available. Later iascable uses the release tag to download the right archive to the local computer to create the Terraform output.
In case when you use specific version numbers in the BOM which uses the module, you need to ensure that version number is also in range of the custom chart which points to the module. That is also relevant for the catalog.yaml we will define later.
Example relevant extract from a BOM -> version: v0.0.7
    # Install terraform-gitops-ubi
    # New custom module linked be the custom catalog
    - name: terraform-gitops-ubi
      version: v0.0.8
      variables:
        - name: command
          value: "echo 'helloworld'"
You can follow the step to create a GitHub tag is that example blog post and then create a release.
6. Create an own catalog
In that example we will not publish the our terraform-gitops-ubi module to the public catalog on Technology Zone Accelerator Toolkit.
We will create our own catalog.yaml file and save the configuration in the GitHub project of the module.
- How to create
catalog.yamlfile? - How to combine various catalogs?
- Inspect the structure of a
catalog.yaml - Create a custom catalog steps
The following diagram shows the simplified dependencies of module, catalog and iascable:
6.1 How to create catalog.yaml file?
It is useful to take a look into iascable documentation and the build-catalog.sh automation.
6.2 How to combine various catalogs?
You can combine more than one catalog resources and BOM inputs with the iascable build command.
Here is the build command:
iascable build [-c {CATALOG_URL}] [-c {CATALOG_URL}] -i {BOM_INPUT} [-i {BOM_INPUT}] [-o {OUTPUT_DIR}]
CATALOG_URLis the url of the module catalog. The default module catalog is https://modules.cloudnativetoolkit.dev/index.yaml. Multiple module catalogs can be provided. The catalogs are combined, with the last one taking precedence in the case of duplicate modules.BOM_INPUTis the input file containing the Bill of Material definition. Multiple BOM files can be provided at the same time.OUTPUT_DIRis the directory where the output terraform template will be generated.
6.3 Inspect the structure of a catalog.yaml
The structure of a catalog can be verified here https://modules.cloudnativetoolkit.dev/index.yaml That is a minimize extraction of the index.yaml above. It contains: categories,modules,aliases and providers.
apiVersion: cloudnativetoolkit.dev/v1alpha1
kind: Catalog
categories:
  - category: ai-ml
  - category: cluster
  - category: databases
  - category: dev-tool
  - category: gitops
    categoryName: GitOps
    selection: multiple
    modules:
      - cloudProvider: ""
        softwareProvider: ""
        type: gitops
        name: gitops-ocs-operator
        description: Module to populate a gitops repo with the resources to provision ocs-operator
        tags:
          - tools
          - gitops
        versions: []
        id: github.com/cloud-native-toolkit/terraform-gitops-ocs-operator
        group: ""
        displayName: ocs-operator
  - category: iam
  - category: image-registry
  - category: infrastructure
  ...
aliases:
  - id: github.com/terraform-ibm-modules/terraform-ibm-toolkit-mongodb
  ...
providers:
  - name: ibm
    source: ibm-cloud/ibm
    variables:
      - name: ibmcloud_api_key
        scope: global
      - name: region
        scope: global
6.4 Inspect the module section of the catalog file in more detail
We see that the modules section does contain following cloudProvider, softwareProvider, id, group, displayName and type which are not a part of the module.yaml. After these entries we insert content of the module.yaml.
6.5 Create a custom catalog
Step 1: Create a terraform-gitops-ubi-catalog.yml and insert following content
Note: Ensure that the github project has a tag and a release!
The right value of the release must be reference in the catalog! (Example version: v0.0.1).
apiVersion: cloudnativetoolkit.dev/v1alpha1
kind: Catalog
categories:
  - category: examples
    categoryName: examples
    selection: multiple
    modules:
      - cloudProvider: ""
        softwareProvider: ""
        type: gitops
        id: github.com/Vishal-Ramani/terraform-gitops-ubi
        group: ""
        displayName: terraform-gitops-ubi
        name: terraform-gitops-ubi
        description: "That module will add a new 'Argo CD config' to deploy a 'ubi' container to OpenShift"
        tags:
          - tools
          - gitops
        versions:
          - platforms:
              - kubernetes
              - ocp3
              - ocp4
            version: v0.0.8
            dependencies:
              - id: gitops
                refs:
                  - source: github.com/cloud-native-toolkit/terraform-tools-gitops.git
                    version: '>= 1.1.0'
              - id: namespace
                refs:
                  - source: github.com/cloud-native-toolkit/terraform-gitops-namespace.git
                    version: '>= 1.0.0'
            variables:
              - name: gitops_config
                type: |-
                  object({
                      boostrap = object({
                        argocd-config = object({
                          project = string
                          repo = string
                          url = string
                          path = string
                        })
                      })
                      infrastructure = object({
                        argocd-config = object({
                          project = string
                          repo = string
                          url = string
                          path = string
                        })
                        payload = object({
                          repo = string
                          url = string
                          path = string
                        })
                      })
                      services = object({
                        argocd-config = object({
                          project = string
                          repo = string
                          url = string
                          path = string
                        })
                        payload = object({
                          repo = string
                          url = string
                          path = string
                        })
                      })
                      applications = object({
                        argocd-config = object({
                          project = string
                          repo = string
                          url = string
                          path = string
                        })
                        payload = object({
                          repo = string
                          url = string
                          path = string
                        })
                      })
                    })
                description: Config information regarding the gitops repo structure
                moduleRef:
                  id: gitops
                  output: gitops_config
              - name: git_credentials
                type: |-
                  list(object({
                      repo = string
                      url = string
                      username = string
                      token = string
                    }))
                description: The credentials for the gitops repo(s)
                sensitive: true
                moduleRef:
                  id: gitops
                  output: git_credentials
              - name: namespace
                type: string
                description: The namespace where the application should be deployed
                moduleRef:
                  id: namespace
                  output: name
              - name: kubeseal_cert
                type: string
                description: The certificate/public key used to encrypt the sealed secrets
                default: ""
                moduleRef:
                  id: gitops
                  output: sealed_secrets_cert
              - name: server_name
                type: string
                description: The name of the server
                default: default
                moduleRef:
                  id: gitops
                  output: server_name
              - name: cluster_type
                description: The cluster type (openshift or kubernetes)
                default: '"openshift"'
              - name: command
                description: Command to run in container
                default: ""
            outputs:
              - name: name
                description: The name of the module
              - name: branch
                description: The branch where the module config has been placed
              - name: namespace
                description: The namespace where the module will be deployed
              - name: server_name
                description: The server where the module will be deployed
              - name: layer
                description: The layer where the module is deployed
              - name: type
                description: The type of module where the module is deployed
6.6. BOM that we will use terraform-gitops-ubi module
Step 1: Clone the project with the example BOM configuration
git clone https://github.com/Vishal-Ramani/UBI-helm-module-example.git
cd example
Step 2: Verify the ibm-vpc-roks-argocd-ubi.yaml BOM file
This is the simplified target architecture what our BOM will create as terraform code for initial setup.
A customized IBM Cloud environment for GitOps and our terraform-gitops-ubi module.
-
For the configuration of GitOps in Red Hat OpenShift. We will use two operators:
-
Red Hat OpenShift GitOps operator
We will create one ArgoCD instance with the Red at OpenShift GitOps operator, that ArgoCD instance will bin initial configured by a newly created GitHub project configure by a Cloud Native Toolkit template for GitOps repositories.
-
Red Hat OpenShift Pipelines operator
There will be no initial setup for a Tekton pipeline at the moment.
That images show a simplified view of the Argo CD basic configuration.
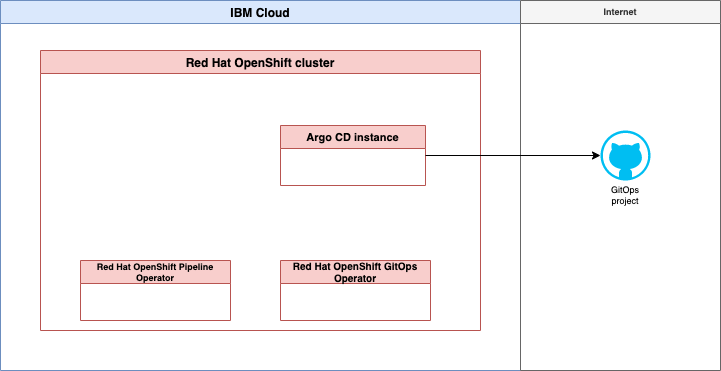
- IBM Cloud infrastructure with Red Hat OpenShift in a Virtual Private Cloud
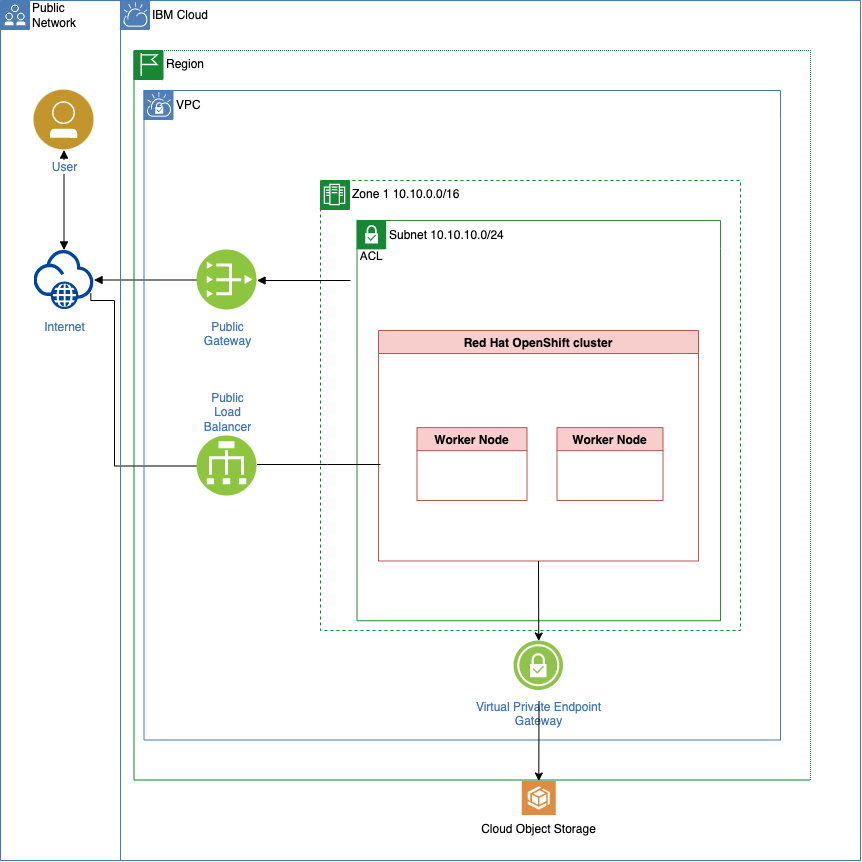
This is the structure of the BOM we are going to use:
- Virtual Private Cloud - related
- ROKS - related (RedHat OpenShift on IBM Cloud)
- GitOps and Bootstrap of GitOps
- Our own module called
terraform-gitops-ubi
Note: You need configure variables to your needs, when you share your IBM Cloud environment with others.
We commented out the # version: v0.0.5 of our module, because we will configure only one version in our catalog.yaml which we will define later.
apiVersion: cloudnativetoolkit.dev/v1alpha1
kind: BillOfMaterial
metadata:
  name: ibm-vpc-roks-argocd-ubi
spec:
  modules:
    # Virtual Private Cloud - related
    # - subnets
    # - gateways
    - name: ibm-vpc
      alias: ibm-vpc
      version: v1.16.1
      variables:
      - name: name
        value: "tsued-gitops-ubi"
      - name: tags
        value: ["tsuedro"]
    - name: ibm-vpc-subnets
      alias: ibm-vpc-subnets
      version: v1.13.2
      variables:
        - name: _count
          value: 1
        - name: name
          value: "tsued-gitops-ubi"
        - name: tags
          value: ["tsuedro"]
    - name: ibm-vpc-gateways
    # ROKS - related
    # - objectstorage
    - name: ibm-ocp-vpc
      alias: ibm-ocp-vpc
      version: v1.15.7
      variables:
        - name: name
          value: "tsued-gitops-ubi"
        - name: worker_count
          value: 2
        - name: tags
          value: ["tsuedro"]
    - name: ibm-object-storage
      alias: ibm-object-storage
      version: v4.0.3
      variables:
        - name: name
          value: "cos_tsued_ubi"
        - name: tags
          value: ["tsuedro"]
        - name: label
          value: ["cos_tsued_ubi"]
    # Install OpenShift GitOps and Bootstrap GitOps (aka. ArgoCD) - related
    # - argocd
    # - gitops
    - name: argocd-bootstrap
      alias: argocd-bootstrap
      version: v1.12.0
      variables:
        - name: repo_token
    - name: gitops-repo
      alias: gitops-repo
      version: v1.20.2
      variables:
        - name: host
          value: "github.com"
        - name: type
          value: "GIT"
        - name: org
          value: "thomassuedbroecker"
        - name: username
          value: "thomassuedbroecker"
        - name: project
          value: "iascable-gitops-ubi"
        - name: repo
          value: "iascable-gitops-ubi"
    # Install ubi
    # New custom module linked be the custom catalog
    - name: terraform-gitops-ubi
      version: v0.0.8
      variables:
        - name: command
          value: "echo 'helloworld'"
7. Create terraform code and create the resources
Use iascable to create the terraform code.
Step 1: Create a credentials.properties file and edit the file
cd example
cp ./credentials.properties-template ./credentials.properties
nano credentials.properties
Provide the your GitHub access token and IBM Cloud API key.
export TF_VAR_gitops_repo_token=XXX
export TF_VAR_ibmcloud_api_key=XXX
Step 2: Execute following commands
BASE_CATALOG=https://modules.cloudnativetoolkit.dev/index.yaml
CUSTOM_CATALOG=https://raw.githubusercontent.com/Vishal-Ramani/UBI-helm-module-example/main/example/catalog/ubi-helm-catalog.yaml

iascable build -i ibm-vpc-roks-argocd-ubi.yaml -c $BASE_CATALOG -c $CUSTOM_CATALOG
Step 3: Verify the created files and folders
tree .
- Example output:
.
├── catalog
│   └── ubi-helm-catalog.yaml
├── credentials.properties
├── credentials.properties-template
├── ibm-vpc-roks-argocd-ubi.yaml
└── output
    ├── ibm-vpc-roks-argocd-ubi
    │   ├── apply.sh
    │   ├── bom.yaml
    │   ├── dependencies.dot
    │   ├── destroy.sh
    │   └── terraform
    │       ├── docs
    │       │   ├── argocd-bootstrap.md
    │       │   ├── gitops-namespace.md
    │       │   ├── gitops-repo.md
    │       │   ├── ibm-object-storage.md
    │       │   ├── ibm-ocp-vpc.md
    │       │   ├── ibm-resource-group.md
    │       │   ├── ibm-vpc-gateways.md
    │       │   ├── ibm-vpc-subnets.md
    │       │   ├── ibm-vpc.md
    │       │   ├── olm.md
    │       │   ├── sealed-secret-cert.md
    │       │   └── terraform-gitops-ubi.md
    │       ├── ibm-vpc-roks-argocd-ubi.auto.tfvars
    │       ├── main.tf
    │       ├── providers.tf
    │       ├── variables.tf
    │       └── version.tf
    └── launch.sh

5 directories, 26 files
Step 4: Navigate to the output folder
cd output
Step 5: Copy the credentials.properties into the output folder
CURRENT_PATH=$(pwd)
PROJECT=ibm-vpc-roks-argocd-ubi
cp $CURRENT_PATH/../credentials.properties $CURRENT_PATH/ibm-vpc-roks-argocd-ubi/credentials.properties
Step 6: Map the current folder to the Multipass cli-tools VM
Ensure you started the Multipass cli-tools VM before you execute the following command:
multipass mount $PWD cli-tools:/automation
Now we have mapped the output folder to the cli-tools VM. We can use the installed CLI tools inside the cli-tools VM to apply the Terraform code.
All changes we made in with
cli-tools VMwill be saved in the mappedoutputfolder on our local machine.
Step 7: Open the interactive shell
multipass shell cli-tools
- Example output:
Last login: Mon Sep 12 18:06:24 2022 from 192.168.64.1
ubuntu@cli-tools:~$
Step 8: In the virtual machine navigate to the automation folder
cd ../../automation
ls
Step 9: Now navigate to the ibm-vpc-roks-argocd-ubi folder
cd ibm-vpc-roks-argocd-ubi/
ls
Step 10: Source the credentials.properties as environment variables and show one variable
source credentials.properties
echo $TF_VAR_ibmcloud_api_key
Step 11: Execute ./apply.sh
./apply.sh
Step 12: Enter yes to apply the Terraform code
Do you want to perform these actions?
  Terraform will perform the actions described above.
  Only 'yes' will be accepted to approve.

  Enter a value:
Step 13: Interactive terminal actions
These values you need to edit:
- Namespace:
ubi-helm - Region:
eu-de - Resource group:
default - gitops-repo_token:
XXX
Variables can be provided in a yaml file passed as the first argument

Provide a value for 'gitops-repo_host':
  The host for the git repository. The git host used can be a GitHub, GitHub Enterprise, Gitlab, Bitbucket, Gitea or Azure DevOps server. If the host is null assumes in-cluster Gitea instance will be used.
> (github.com)
Provide a value for 'gitops-repo_org':
  The org/group where the git repository exists/will be provisioned. If the value is left blank then the username org will be used.
> (thomassuedbroecker)
Provide a value for 'gitops-repo_project':
  The project that will be used for the git repo. (Primarily used for Azure DevOps repos)
> (iascable-gitops-ubi)
Provide a value for 'gitops-repo_username':
  The username of the user with access to the repository
> (thomassuedbroecker)
Provide a value for 'gitops-repo_token':
  The personal access token used to access the repository
> XXXX
> Provide a value for 'region':
> eu-de
Provide a value for 'worker_count':
  The number of worker nodes that should be provisioned for classic infrastructure
> (2)
Provide a value for 'ibm-ocp-vpc_flavor':
  The machine type that will be provisioned for classic infrastructure
> (bx2.4x16)
Provide a value for 'common_tags':
  Common tags that should be added to the instance
> ([])
Provide a value for 'ibm-vpc-subnets__count':
  The number of subnets that should be provisioned
> (1)
Provide a value for 'resource_group_name':
  The name of the resource group
> default
Provide a value for 'namespace_name':
  The value that should be used for the namespace
> ubi-helm
Step 14: Verify the output of terraform execution
After some time you should get following output:
Apply complete! Resources: 103 added, 0 changed, 0 destroyed.
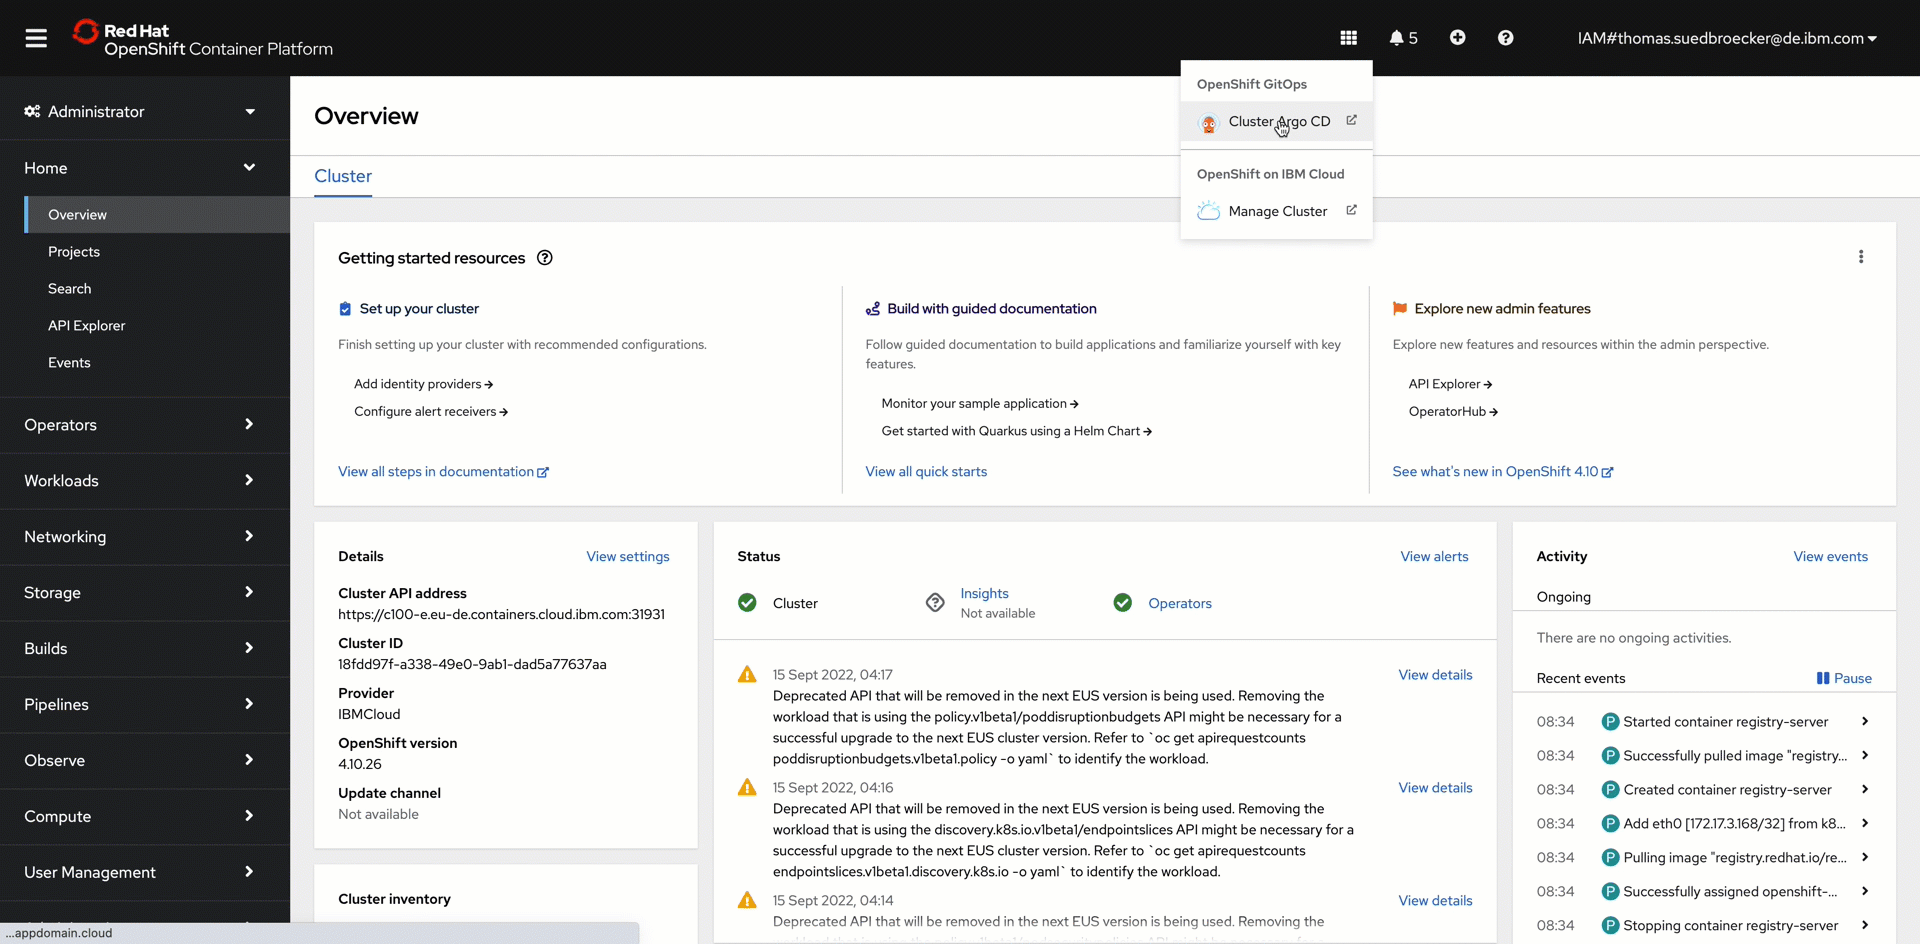
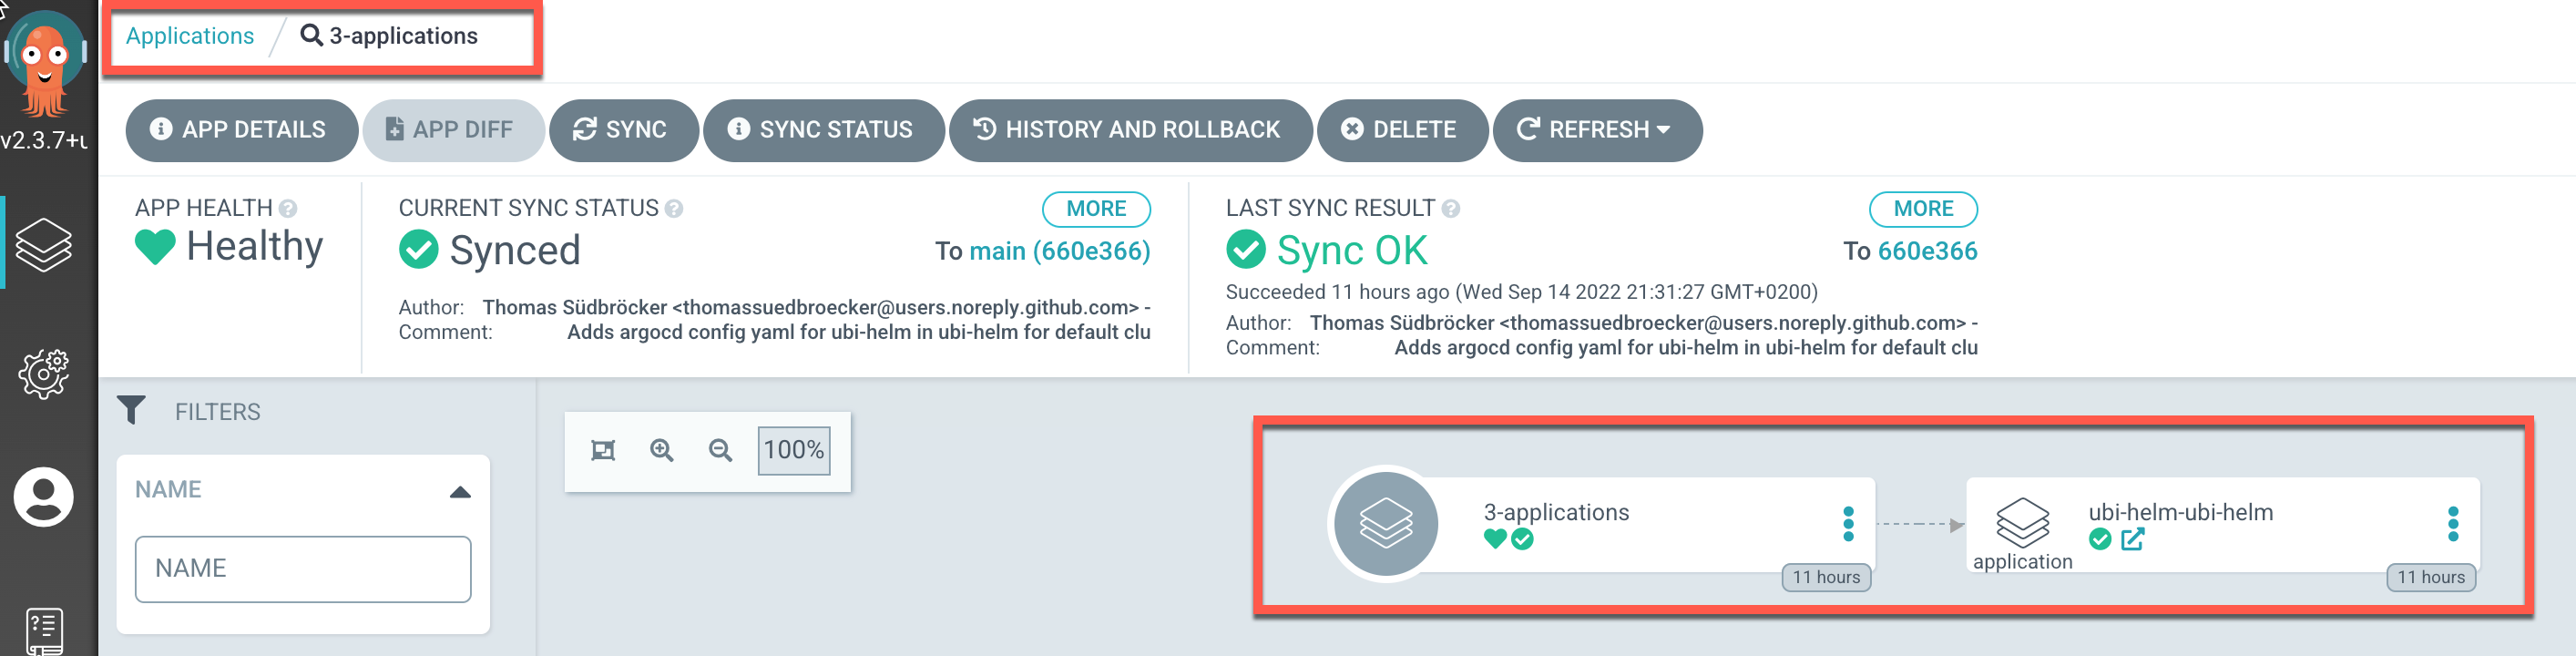
Step 15: Open Argo CD in OpenShift and verify the application instances
Follow the steps in the shown in the gif.
Step 16: Access the UBI pod in OpenShift and execute ls in the terminal
Follow the steps in the shown in the gif.
8. Verify the created Argo CD configuration on GitHub
We see that in our GitHub account new repository was created from the GitOps bootstrap module and the terraform-tools-gitops module to figure Argo CD for by using the app-of-apps concept with a single GitHub repository to manage all Argo CD application configuration and helm configurations to deploy applications in the GitOps context.
Reminder the boot strap configuration is shown in the following image for details visit the GitOps Repository Structure module.
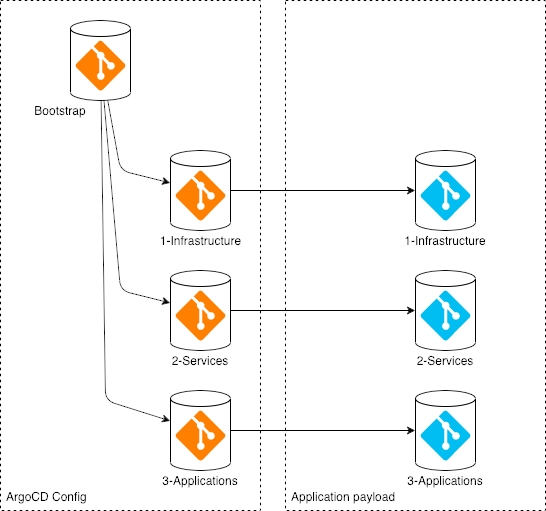
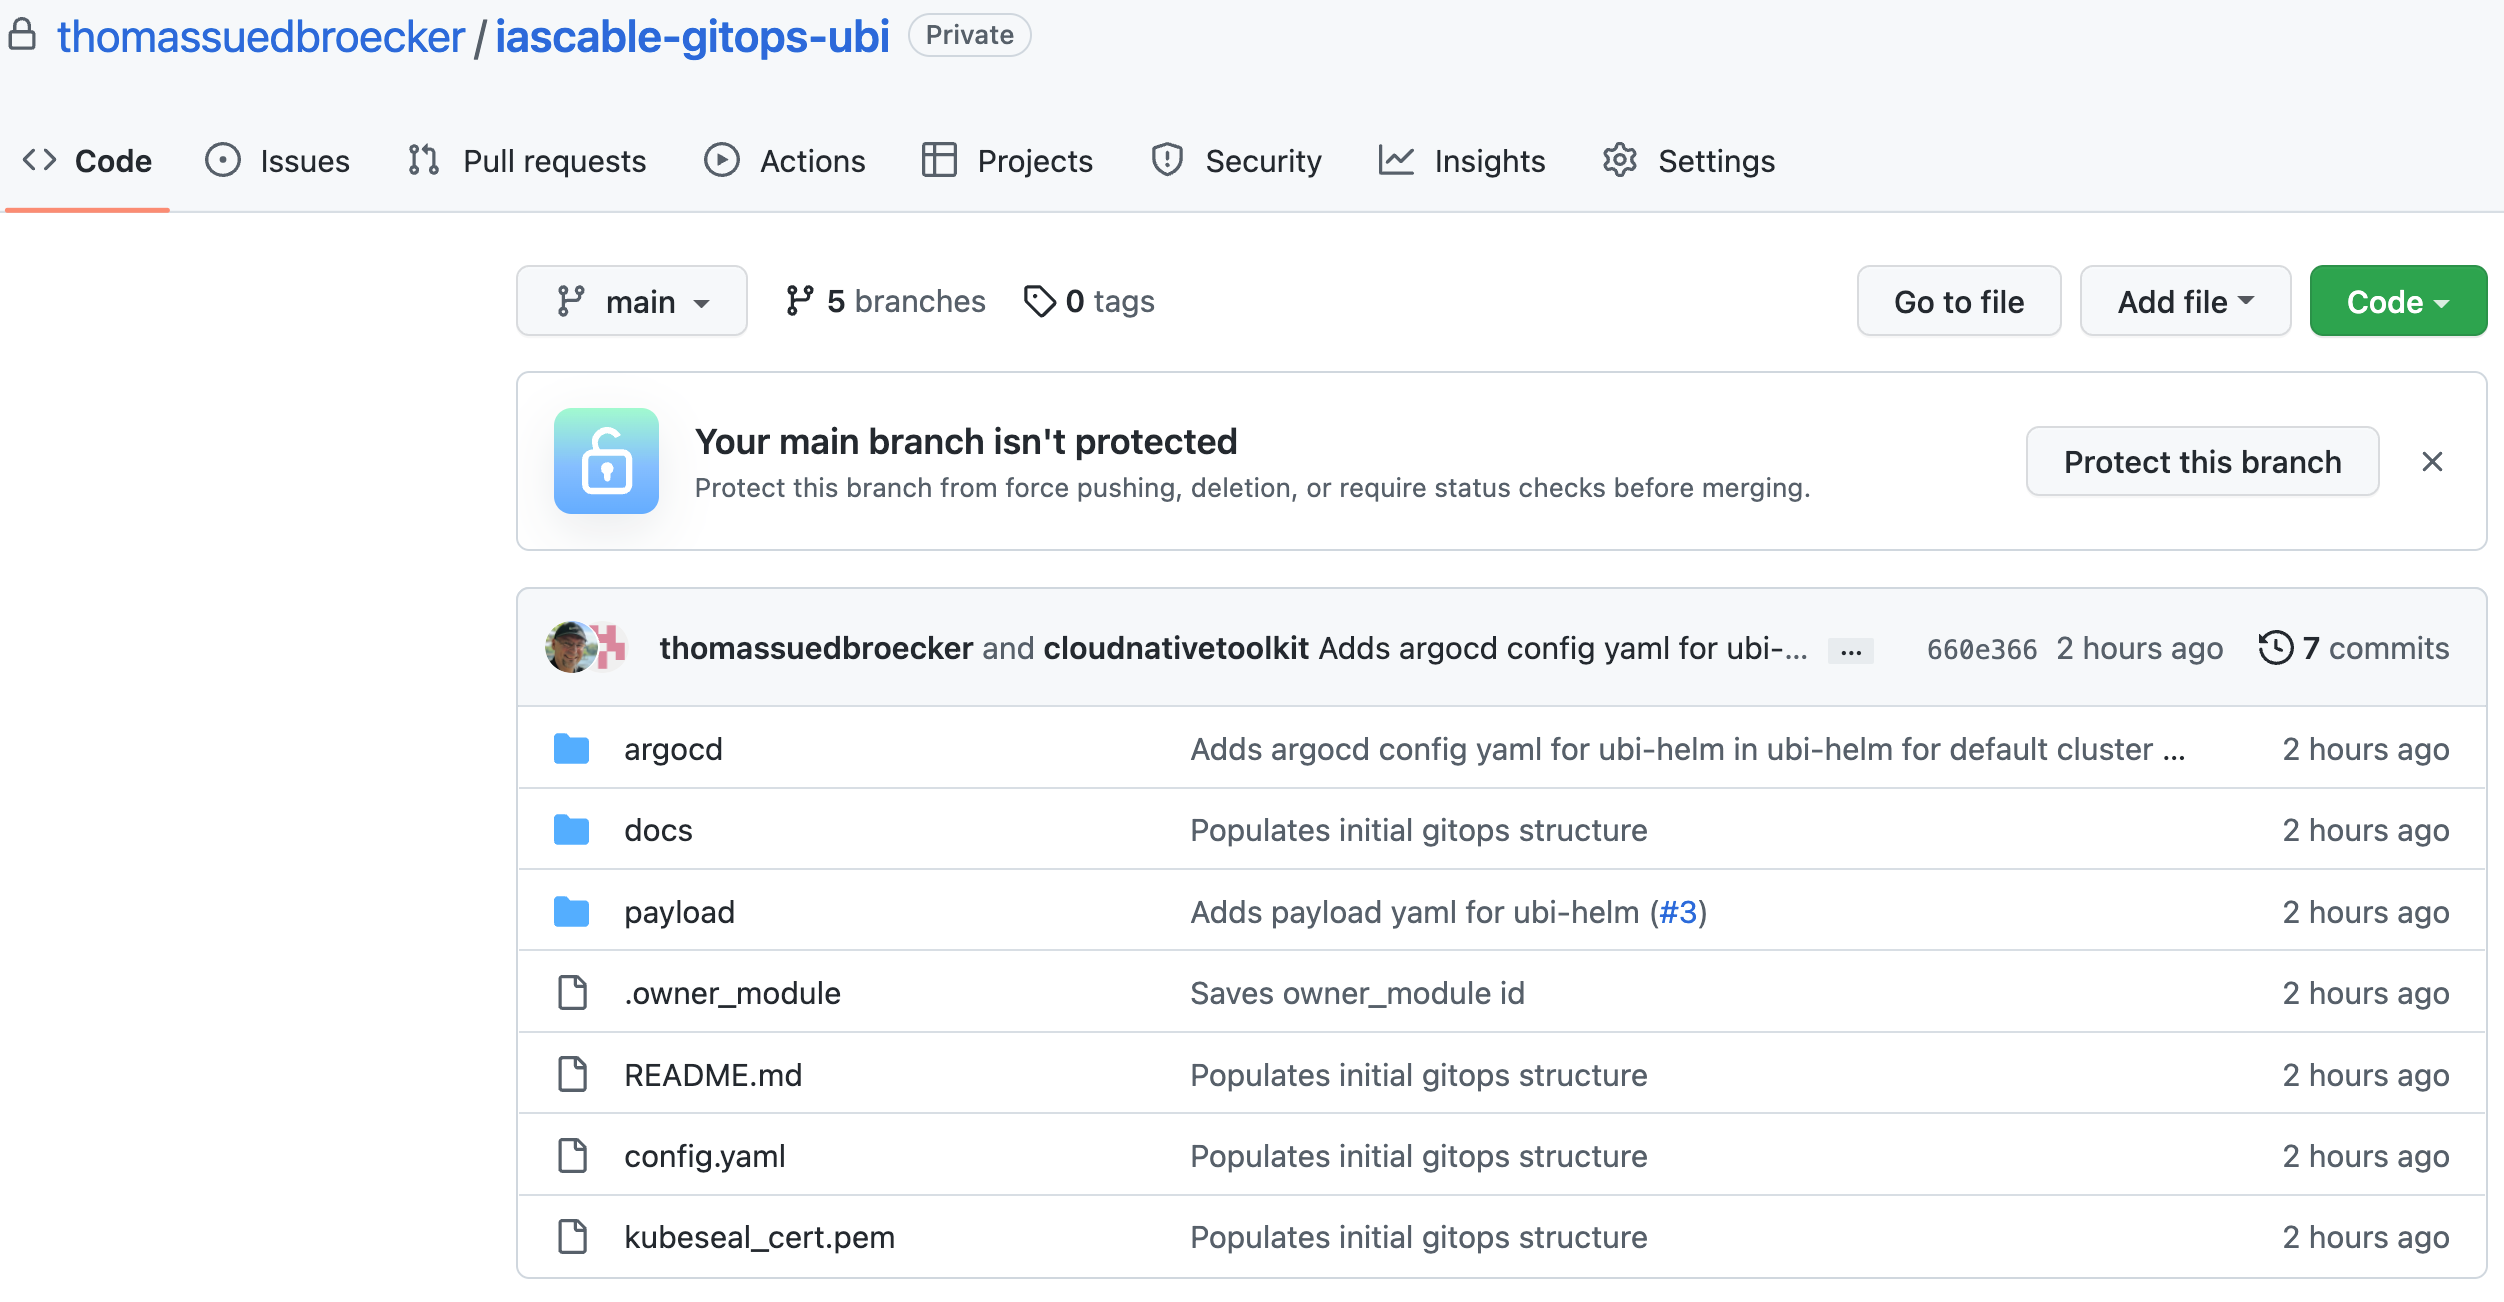
The new GitHub repository is called iascable-gitops-ubi in our case.
The new iascable-gitops-ubi repository contains two folders the following image shows the relation to the bootstrap configuration.
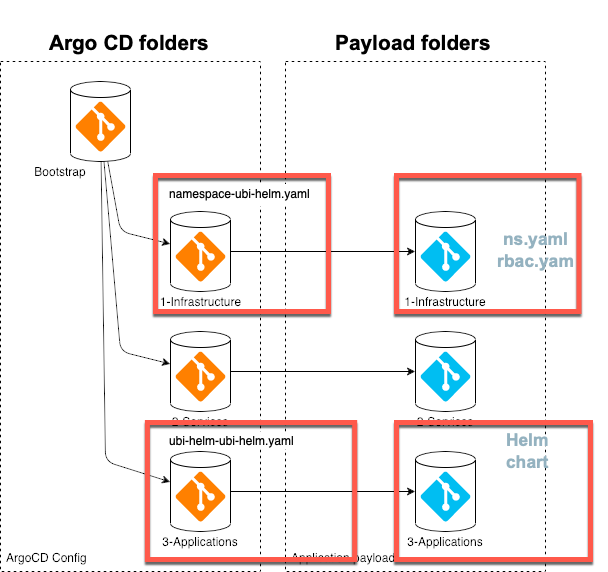
- argocd folder which contains the configuration for
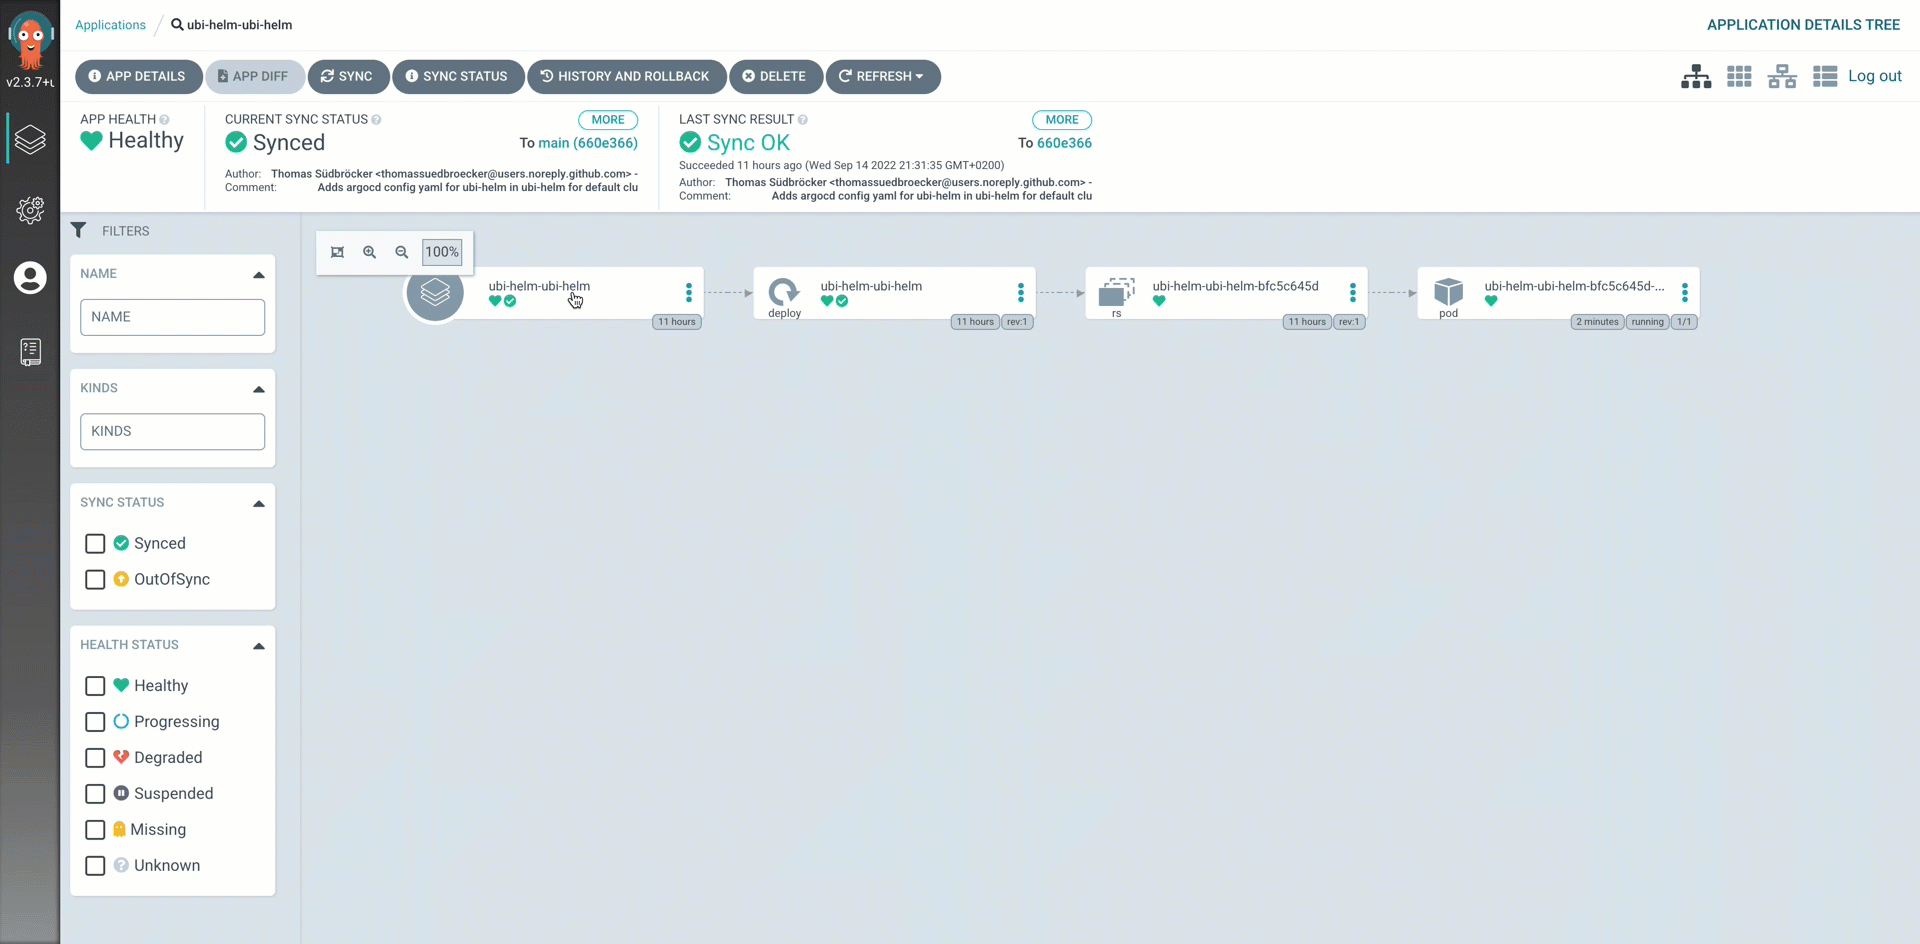
Argo CDlet us call it app-of-apps folder. The following image displays the resulting configuration inArgo CD
- payload folder which contains the current helm deployment for the apps which will be deployed. The following image show the deployment created by
appsin our case the ubi-helm.
The following image shows the newly created GitHub iascable-gitops-ubi repository.
For more details visit the template of the terraform-tools-gitops module.
8.1 Understand how the ubi module content was pasted into the new iascable-gitops-ubi repository
Following the concept for the gitops bootstrap setup documented in the template-terraform-gitops GitHub repository.
We have two main folders in the iascable-gitops-ubi repository.
- One for the
Argo CD applicationconfigurations calledargocd - One for the application which will be deployed be the
Argo CD applicationconfigurations called payload.
Let us inspect these two folders. The gif below shows some of the created files and folders.
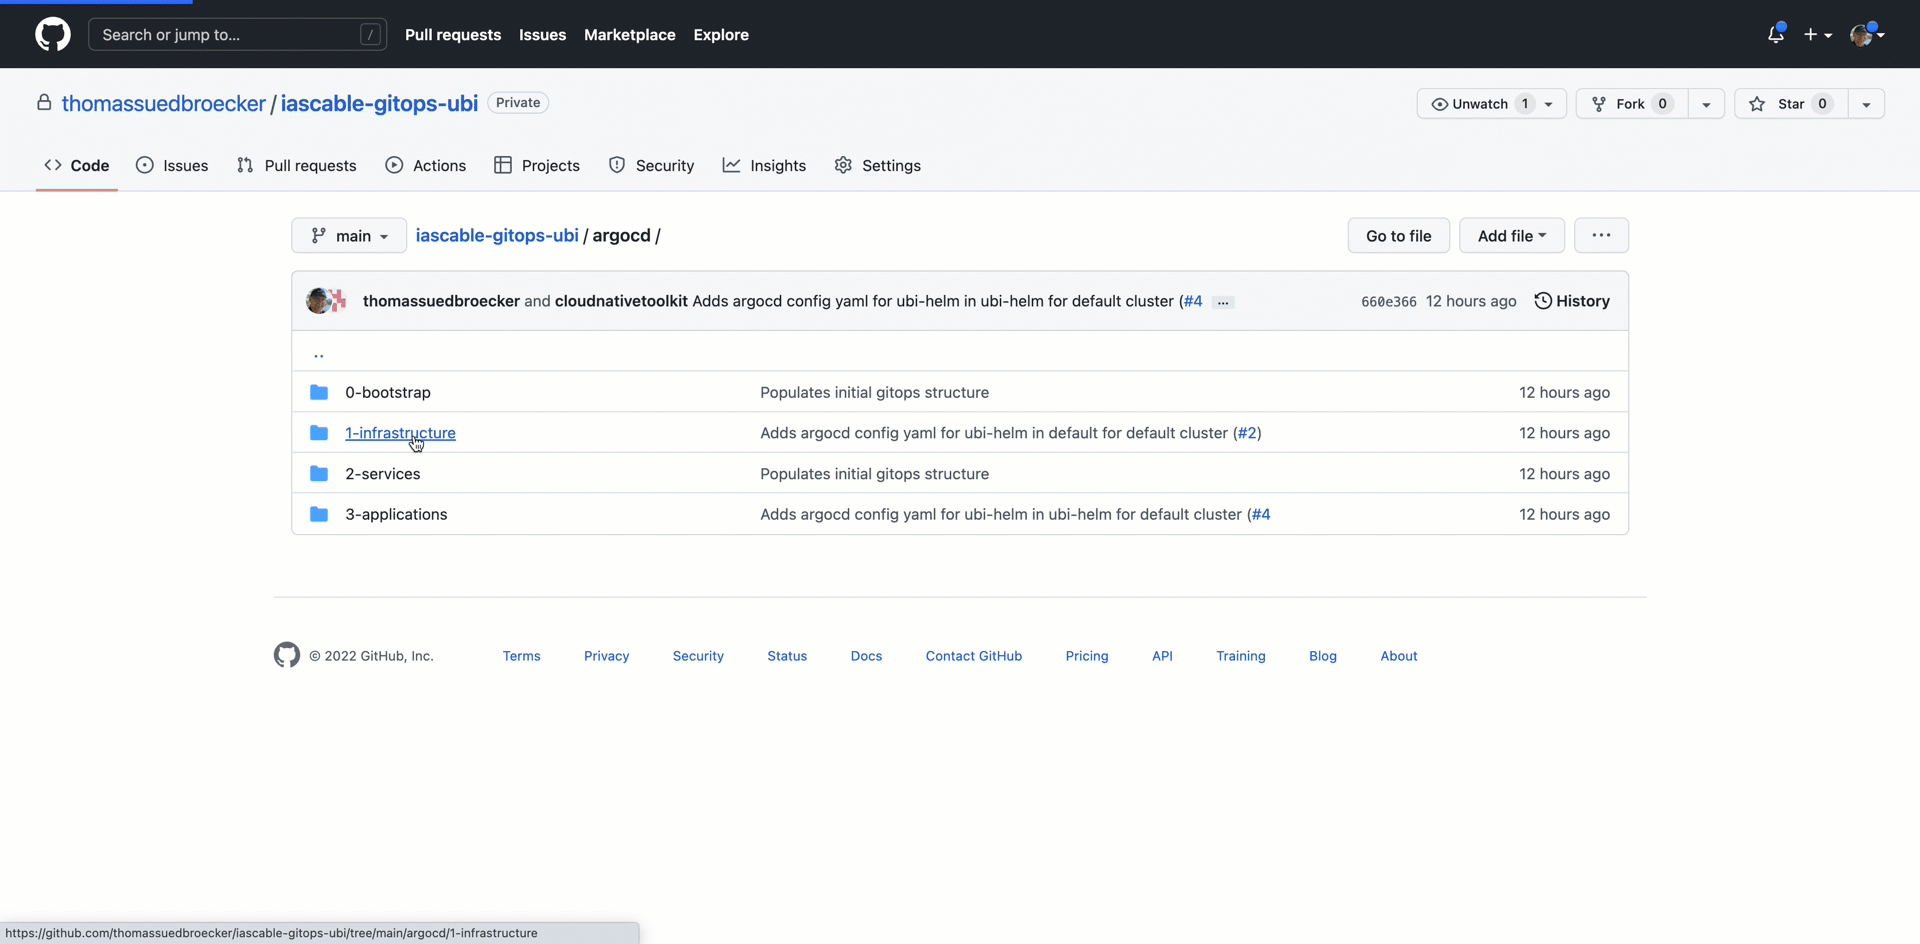
8.1.1 argocd folder
There were two Argo CD application configurations added into the iascable-gitops-ubi repository.
-
One for the
namespacein the OpenShift or Kubernetes cluster where the ubi application will be deployed. ThatArgo CD applicationconfiguration is related to exiting1-infrastructureArgo CD project created by the GitOps bootstrap module. -
One for the
ubiapplication we want to deploy. ThatArgo CD applicationconfiguration is related to exiting3-applicationArgo CD project created by the GitOps bootstrap module.
Let's take a look a the created Argo CD application configurations
We have two Argo CD application configurations:
8.1.1.1 ubi Namespace in argocd.1-infrastructure.cluster.default.base.namespace-ubi-helm.yaml
apiVersion: argoproj.io/v1alpha1
kind: Application
metadata:
  name: namespace-ubi-helm
  finalizers:
    - resources-finalizer.argocd.argoproj.io
spec:
  destination:
    namespace: default
    server: https://kubernetes.default.svc
  project: 1-infrastructure
  source:
    path: payload/1-infrastructure/namespace/ubi-helm/namespace
    repoURL: https://github.com/thomassuedbroecker/iascable-gitops-ubi.git
    targetRevision: main
  syncPolicy:
    automated:
      prune: true
      selfHeal: true
  ignoreDifferences: []
8.1.1.2 UBI application deployment argocd.3-applications.cluster.default.base.ubi-helm-ubi.yaml
This is the Argo CD application configuration ubi-helm-ubi-helm.yaml file, which was created automatically by our module with the igc gitops-module command.
That payload directory is used as the source.path in that Argo CD application configuration as you see above.
apiVersion: argoproj.io/v1alpha1
kind: Application
metadata:
  name: ubi-helm-ubi-helm
  finalizers:
    - resources-finalizer.argocd.argoproj.io
spec:
  destination:
    namespace: ubi-helm
    server: https://kubernetes.default.svc
  project: 3-applications
  source:
    path: payload/3-applications/namespace/ubi-helm/ubi-helm
    repoURL: https://github.com/thomassuedbroecker/iascable-gitops-ubi.git
    targetRevision: main
    helm:
      releaseName: ubi-helm
  syncPolicy:
    automated:
      prune: true
      selfHeal: true
  ignoreDifferences: []
8.1.2 payload folder
That folder contains a namespace payload and the helm-chart payload.
8.1.2.2 ubi Namespace in payload.1-infrastructure.cluster.default.base
In the folder payload.1-infrastructure.cluster.default.base we have an ns.yaml and rbac.yaml.
ns.yaml
apiVersion: v1
kind: Namespace
metadata:
  name: ubi-helm
  annotations:
    argocd.argoproj.io/sync-wave: "-30"
---
apiVersion: operators.coreos.com/v1
kind: OperatorGroup
metadata:
  name: ubi-helm-operator-group
  namespace: ubi-helm
  annotations:
    argocd.argoproj.io/sync-wave: "-20"
spec:
  targetNamespaces:
    - ubi-helm
rbac.yaml
apiVersion: rbac.authorization.k8s.io/v1
kind: Role
metadata:
  name: argocd-admin
  namespace: ubi-helm
  annotations:
    argocd.argoproj.io/sync-wave: "-20"
rules:
- apiGroups:
  - "*"
  resources:
  - "*"
  verbs:
  - "*"
---
apiVersion: rbac.authorization.k8s.io/v1
kind: RoleBinding
metadata:
  name: argocd-admin
  namespace: ubi-helm
  annotations:
    argocd.argoproj.io/sync-wave: "-20"
roleRef:
  apiGroup: rbac.authorization.k8s.io
  kind: Role
  name: argocd-admin
subjects:
- apiGroup: rbac.authorization.k8s.io
  kind: Group
  name: system:serviceaccounts:openshift-gitops
8.1.1.2 ubi helm application deployment payload.3-applications.cluster.default.base
That folder contains the ubi application helm chart configuration to deploy the ubi application.
The script scripts/create-yaml.sh of our module terraform-gitops-ubi was responsible to copy the ubi helm-chart into the payload directory. Therefor we did the customization of that file.
We defined the values content for the helm chart variables before in the module.tf file. That file values.yaml file is used in Argo CD application configuration for the parameters.
  values_content = {
    ubi-helm = {
      // create entry
    }
  }
The following gif shows the relation of the parameter configuration for the helm-chart