Lab 2: Use IasCable to create a VPC and a Red Hat OpenShift cluster on IBM Cloud
The following list represents the modules which are referenced in the example IBM ROKS Bill of Materials for IasCable.
- IBM VPC
ibm-vpc - IBM VPC Subnets
ibm-vpc-subnets - IBM Cloud VPC Public Gateway
ibm-vpc-gateways - IBM OpenShift VPC cluster
ibm-ocp-vpc
1. Pre-requisites for the example
Following tools need to be installed on your local computer to follow the step by step instructions.
That is the cloud environment we will use.
2. Step-by-step setup example
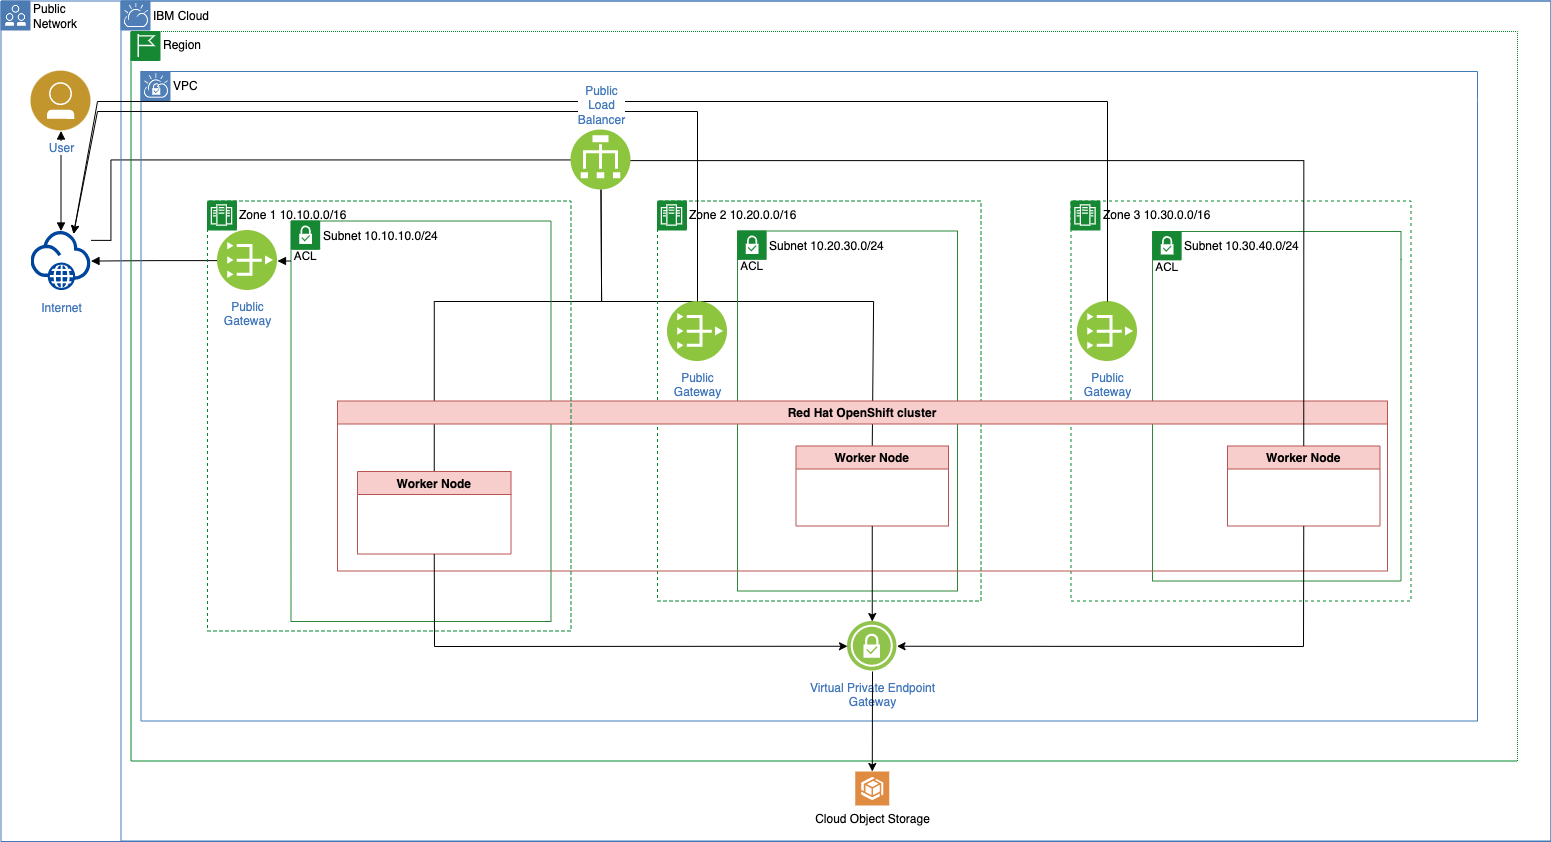
This is a step by step setup to create a Virtual Private Cloud and an IBM Cloud managed Red Hat OpenShift cluster.
- 1 x
Virtual Private Cloud - 3 x
Subnets - 2 x
Access Control Lists - 1 x
Routing Table - 2 x
Security Groups - 3 x
Public Gateway - 1 x
Virtual Private Endpoint Gateway -
3 x
Worker Nodesone in each zone -
Simplified architecture overview
Step 1: Write the Bill of Material BOM file
nano my-vpc-roks-bom.yaml
Copy and past the following content into the my-vpc-roks-bom.yaml file.
apiVersion: cloudnativetoolkit.dev/v1alpha1
kind: BillOfMaterial
metadata:
  name: my-ibm-vpc-roks
spec:
  modules:
    - name: ibm-vpc
    - name: ibm-vpc-subnets
    - name: ibm-vpc-gateways
    - name: ibm-ocp-vpc
      variables:
        - name: worker_count
          value: 1
Step 2: Build the project based on Bill of Material BOM file
iascable build -i my-vpc-roks-bom.yaml
- Output:
Loading catalog from url: https://modules.cloudnativetoolkit.dev/index.yaml
Name: my-ibm-vpc-roks
Writing output to: ./output
Step 3: Verify the created files and folders
tree
- Output:
.
├── my-vpc-roks-bom.yaml
└── output
    ├── launch.sh
    └── my-ibm-vpc-roks
        ├── apply.sh
        ├── bom.yaml
        ├── dependencies.dot
        ├── destroy.sh
        └── terraform
            ├── docs
            │   ├── ibm-object-storage.md
            │   ├── ibm-ocp-vpc.md
            │   ├── ibm-resource-group.md
            │   ├── ibm-vpc-gateways.md
            │   ├── ibm-vpc-subnets.md
            │   └── ibm-vpc.md
            ├── main.tf
            ├── my-ibm-vpc-roks.auto.tfvars
            ├── providers.tf
            ├── variables.tf
            └── version.tf

4 directories, 17 files
You can find details of the created files and folders also in IasCable starting point GitHub project and that blog post.
In the newly created bom.yaml file we can find more detailed information about modules we are going to use.
apiVersion: cloudnativetoolkit.dev/v1alpha1
kind: BillOfMaterial
metadata:
  name: my-ibm-vpc-roks
spec:
  modules:
    - name: ibm-ocp-vpc
      alias: cluster
      version: v1.15.4
      variables:
        - name: worker_count
          value: 1
    - name: ibm-vpc
      alias: ibm-vpc
      version: v1.16.0
    - name: ibm-vpc-gateways
      alias: ibm-vpc-gateways
      version: v1.9.0
    - name: ibm-vpc-subnets
      alias: ibm-vpc-subnets
      version: v1.13.2
    - name: ibm-resource-group
      alias: resource_group
      version: v3.2.16
    - name: ibm-object-storage
      alias: cos
      version: v4.0.3
  variables:
    - name: region
      type: string
      description: The IBM Cloud region where the cluster will be/has been installed.
    - name: ibmcloud_api_key
      type: string
      description: The IBM Cloud api token
    - name: worker_count
      type: number
      description: >-
        The number of worker nodes that should be provisioned for classic
        infrastructure
      defaultValue: 1
    - name: cluster_flavor
      type: string
      description: The machine type that will be provisioned for classic infrastructure
      defaultValue: bx2.4x16
    - name: ibm-vpc-subnets__count
      type: number
      description: The number of subnets that should be provisioned
      defaultValue: 3
    - name: resource_group_name
      type: string
      description: The name of the resource group
- (Network) IBM VPC
ibm-vpc - (Network) IBM VPC Subnets
ibm-vpc-subnets - (Network) IBM Cloud VPC Public Gateway
ibm-vpc-gateways
This module makes use of the output from other modules: * Resource group - github.com/cloud-native-toolkit/terraform-ibm-resource-group.git * VPC - github.com/cloud-native-toolkit/terraform-ibm-vpc.git
This module makes use of the output from other modules: * Object Storage - github.com/cloud-native-toolkit/terraform-ibm-object-storage.git * VPC - github.com/cloud-native-toolkit/terraform-ibm-vpc.git * Subnet - github.com/cloud-native-toolkit/terraform-ibm-vpc.git
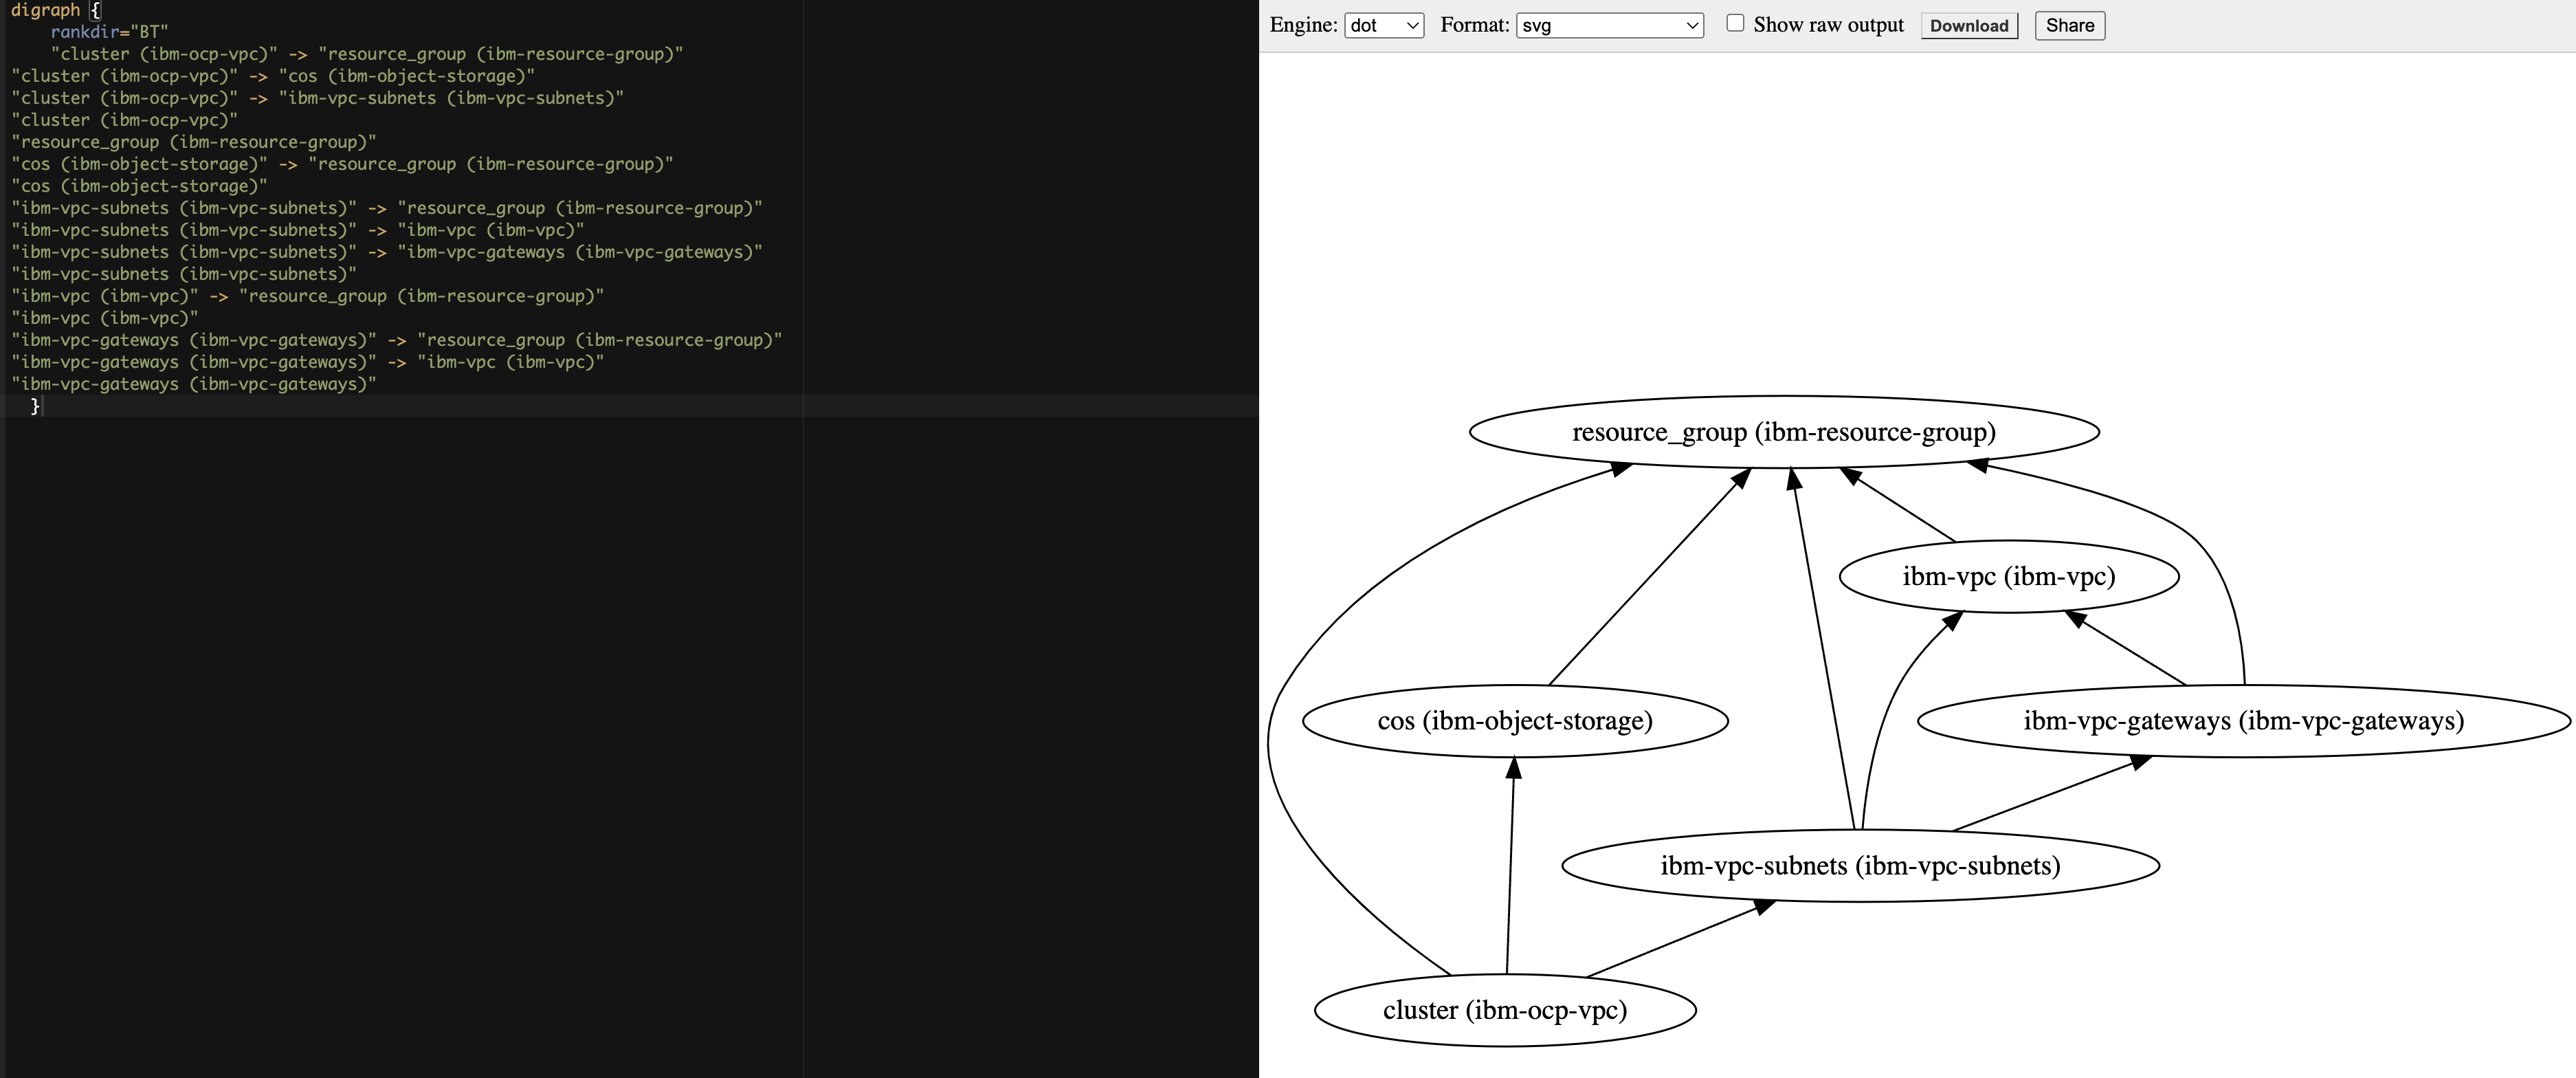
Added modules based on module dependencies:
We can verify the dependencies with the dependencies.dot content for example in Graphviz Online.
Step 4: Execute the terraform init command
Navigate to the output/my-ibm-vpc-roks/terraform folder and execute the terraform init command.
cd output/my-ibm-vpc-roks/terraform
terraform init
Step 5: Execute the terraform apply command
Execute the terraform apply command.
terraform apply -auto-approve
Note: You can create an
IBM Cloud API Keywith following command:ibmcloud iam api-key-create iascable-example.
- Input of your variables:
var.ibmcloud_api_key
  The IBM Cloud api token
  Enter a value: XXX

var.region
  The IBM Cloud region where the cluster will be/has been installed.
  Enter a value: eu-de

var.resource_group_name
  The name of the resource group
  Enter a value: default
- Output:
Finally you should get this output in your terminal.
...
Apply complete! Resources: 56 added, 0 changed, 0 destroyed.
Following files were created, that you should delete because these will used for the deletion or update of the resources. I added those files in my case to
.gitignore.
example/output/my-ibm-vpc-roks/terraform/.terraform.lock.hcl
example/output/my-ibm-vpc-roks/terraform/clis-debug.log
example/output/my-ibm-vpc-roks/terraform/.kube/b88790957171731697722dc07f0f923283278cf784b9fce792b831afbab8d83e_default-cluster_admin_k8sconfig/admin-key.pem
example/output/my-ibm-vpc-roks/terraform/.kube/b88790957171731697722dc07f0f923283278cf784b9fce792b831afbab8d83e_default-cluster_admin_k8sconfig/admin.pem
example/output/my-ibm-vpc-roks/terraform/.kube/b88790957171731697722dc07f0f923283278cf784b9fce792b831afbab8d83e_default-cluster_admin_k8sconfig/config.yml
example/output/my-ibm-vpc-roks/terraform/.kube/b88790957171731697722dc07f0f923283278cf784b9fce792b831afbab8d83e_default-cluster_k8sconfig/config.yml
example/output/my-ibm-vpc-roks/terraform/bin2/.igc-release
example/output/my-ibm-vpc-roks/terraform/bin2/igc
example/output/my-ibm-vpc-roks/terraform/bin2/jq
example/output/my-ibm-vpc-roks/terraform/bin2/yq3
example/output/my-ibm-vpc-roks/terraform/bin2/yq4
Step 6: Execute the terraform destroy command
Note: Ensure you didn't delete created files before.
To destroy the provisioned resources, run the following:
terraform destroy -auto-approve
You need to provide the IBM Cloud API Key, the region and the resource group name again, because we didn't save those values in variables.
var.ibmcloud_api_key
  The IBM Cloud api token
  Enter a value: XXX

var.region
  The IBM Cloud region where the cluster will be/has been installed.
  Enter a value: eu-de

var.resource_group_name
  The name of the resource group
  Enter a value: default
- Output:
The final output should be:
Destroy complete! Resources: 56 destroyed.
3. Summary
When you use IasCable and the Modules it is much easier to setup infrastructure on a cloud using Terraform. The Modules containing a lot of pre-work and IasCable creates automated an awesome starting point for you. Surely you still should understand what are you creating and the final architecture you will be produce.
Especially the pre-work for the example we use which divides the worker nodes over 3 zones, does pre-configurations of rules for the security groups and many more. So I looking forward now to get started with the GitOps topic which is also a part of the Modules in that framework.